Why Wall Paneling Is Worth Your Time
Looking to give your space a boost without breaking the bank or hiring a contractor? Wall paneling is one of the simplest upgrades that delivers real design impact in just a weekend.
Quick Wins for Major Visual Impact
Wall paneling instantly adds structure and interest to any room. Whether you’re dressing up a plain hallway or giving your living room a focal point, paneling makes a difference you can see.
Frames and defines walls for a finished look
Adds depth and character with minimal effort
Works with both modern and classic interiors
Style Without the Splurge
These projects don’t require a huge budget or expensive materials. With a few MDF strips, a level, and a little time, you can mimic high end design trends at a fraction of the cost.
Affordable materials readily available at home improvement stores
Options to use what you already have like leftover plywood
No need to invest in expensive tools or pay labor costs
Texture, Warmth, and Architectural Detail
Wall paneling introduces subtle texture that elevates plain walls. It also creates a sense of warmth and charm that paint alone can’t deliver.
Breaks up large surface areas for a cozier feel
Mimics architectural features like wainscoting or custom trim
Can be customized with paint, stain, or layered styles for added richness
Whether you rent or own, wall paneling is a go to option for creating inviting, stylish spaces without a complete overhaul.
Project 1: Classic Board and Batten
This project blends timeless design with real DIY simplicity. You don’t need much to get going, and the finished look adds subtle structure to any blank wall.
Materials You’ll Need
MDF or wood strips (1″ to 4″ wide, depending on your style)
Construction adhesive or brad nails (ideally, both)
A level (a laser level will make it even easier)
Wood filler and sandpaper
Caulk (for those shadowy gaps)
Primer and paint (semi gloss or satin works great)
Step by Step Layout and Install Tips
- Measure your wall height and width. Decide how many vertical battens you want. Spacing and balance matter more than precise measurements.
- Mark your layout. Use painter’s tape or a pencil line to test your spacing visually before committing.
- Install a top horizontal strip first. This creates your upper line and anchors the look.
- Add vertical battens. Use a level to line everything up. Check spacing as you go.
- Attach each piece. Apply adhesive, press firmly, then nail into place. Fill gaps and holes with caulk and wood filler.
- Sand smooth, then prime and paint. Two coats will typically do it. Paint the wall and molding the same color for cohesion.
Best Rooms For This Treatment
Board and batten shines in entryways, dining rooms, hallways, or any space with blank walls begging for depth. It turns flat into finished, fast with minimal effort.
Whether you’re upgrading a builder basic hallway or framing a reading nook, this project adds a polished edge that reads custom without the custom price tag.
Project 2: DIY Shiplap Without the Hassle
If you’ve got a free weekend and a wall begging for some character, faux shiplap is a solid move. Skip the expensive pre made panels grab a sheet or two of 1/4 inch plywood and slice it into even strips (6 inches is a popular width). Most big box stores will cut it for you, no sweat.
Attach the strips directly to the wall using a nail gun or construction adhesive. Start from the bottom and work your way up. To keep spacing even between each board, use nickels or tile spacers they’re simple, cheap, and get the job done. Don’t eyeball it precise spacing is what keeps shiplap looking clean instead of chaotic.
Once up, give everything a quick sand and hit those nail holes with filler. Caulk the edges for a polished look. Then prime well. Paint goes fast if you use a roller followed by a smooth brush pass. Stick to satin or eggshell for that classic finish not too shiny, not totally flat.
This method nails the farmhouse meets modern vibe, without stressing your budget or your sanity.
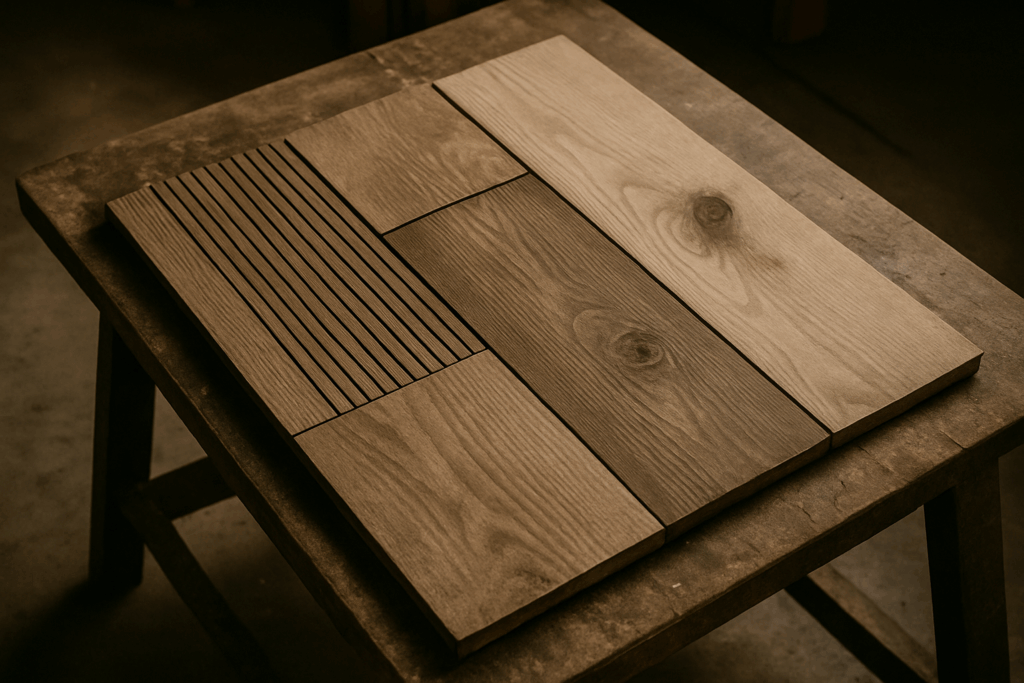
Project 3: Modern Square Grid Panels
This is paneling at its cleanest and sharpest. The square grid look isn’t just modern it’s minimalist with bite. To get it right, precision is everything. Measure twice, then again. Even spacing between each vertical and horizontal batten is non negotiable if you want that sleek, high end result.
One no fail layout hack: painter’s tape. Use it to map out your grid before cutting a single board. It lets you visualize spacing and scale in real time, and stay flexible with your design. You can shift things around before committing, which is basically free insurance against regret.
For color, go bold or don’t bother. Deep navy makes a space feel grounded and stylish. Matte black adds drama without getting flashy. These tones punch up architectural character and make your grid lines pop. Keep the finish flat or eggshell nothing glossy. Let the geometry do the talking.
Project 4: Vertical Slat Walls
If you’re dealing with a narrow hallway or a tall, echoey room that feels more like a tunnel than a living space, vertical slat walls are your secret weapon. Clean, rhythmic lines draw the eye up (or along), instantly adding depth and structure without overwhelming the room.
For finish options, think about vibe and lighting. Stain works best where you want to warm things up or show off real wood texture cabins, reading nooks, cozy corners. Paint, on the other hand, can go bold or soft depending on the color; matte black turns up the drama, while pale shades blend into minimalist spaces. Either way, the slats give you layers without bulk.
This is also one of the best tricks for entryways or hallway walls. These often overlooked zones suddenly feel purposeful. A slatted accent wall adds enough visual interest that you can skip the artwork altogether or keep it spare and let the texture carry the room.
Tools & Materials Checklist
If you’re just starting out, you don’t need to drop a fortune to pull off solid wall paneling. Here’s what’s essential to have on hand:
Basic Tools for Beginners
Miter saw (or a handsaw and miter box if your budget’s tight)
Nail gun (manual hammer and nails can work, just slower)
Level and measuring tape
Stud finder (if you’re mounting anything heavy)
Caulk gun + paintable caulk
Sanding block
Painter’s tape
These tools cover almost all the styles from board and batten to vertical slats.
Budget Breakdown by Project
Board and Batten: $60 $120
Faux Shiplap: $80 $150
Modern Grid Panels: $90 $160
Vertical Slat Walls: $100 $180
Costs include materials (like MDF or plywood), nails or adhesive, paint, and basic supplies. Tools are a one time buy (or borrow).
Where to Buy Cheap (But Solid) Materials
Big box stores like Home Depot and Lowe’s usually have pre cut MDF and plywood
Local lumberyards sometimes offer better quality at lower prices for bulk sheets
Online sellers (Facebook Marketplace, Craigslist) are great for left over lots
Habitat for Humanity Restores for second hand tools and offloading leftovers
Go in with a plan so you’re not overspending or wandering the aisles for paint samples you don’t need.
Where to Get More Ideas
Once you’ve nailed the basics, it’s easy to hit a creative wall literally. But there’s more to paneling than grids and shiplap. Step outside the lines and think textures. Mix raw wood slats with bold paint colors for contrast that feels modern and grounded. Add upholstered panels in a reading nook for both acoustics and softness.
Don’t be afraid to layer materials. A painted wall can get a sculptural upgrade with wavy MDF overlays or brushed metal trims. Fabric wrapped panels can define a bedroom space without permanent commitment. And even cork tiles, tinted or left natural, bring both warmth and function into a workspace.
Traditional isn’t your only option. Twist it, layer it, reimagine it. Playing with panels is where form meets function and the fun starts.
For fresh takes and inspiration, check out more wall paneling ideas to elevate your space.
Mistakes to Avoid
Wall paneling looks simple but the basics matter. Miss a step early on, and it shows all the way through.
Skipping prep work is the fastest way to wind up with uneven walls and crooked lines. You need to clean the surface, check for warps, and map things out before the first cut. If you’re paneling over textured walls, a quick skim coat or smoothing step saves headaches later.
Measuring errors are another common pitfall. One off measurement can throw off your entire layout. Use a level, mark twice, and don’t rely on eyeballing. It’s not rocket science, but it does need precision.
Finally, don’t treat primer like an optional bonus. A good primer makes your paint stick better, look smoother, and last longer. It also seals the surface so your topcoat doesn’t soak in unevenly.
If the goal is clean, professional looking results you’ve got to respect the process. These aren’t fancy mistakes, but they’re the ones that separate a quick win from a wasted weekend.
Keep It Simple, Keep It Stylish
Wall paneling doesn’t have to be a major renovation commitment. These DIY projects are designed for simplicity, making them perfect for a weekend upgrade without the need for professional help.
Why These Projects Work for DIYers
No contractor required Everything can be done with beginner friendly tools and techniques
Low commitment Transform just one wall or a small nook
Quick turnaround Most projects can be completed in a single weekend
Experiment Without the Pressure
Whether you’re testing out a new design style or just want to refresh a space, these paneling ideas offer a low risk way to experiment:
Try bold colors or new textures on a single accent wall
Mix paneling styles for a modern, custom look
Use removable options like adhesive backed panels if you’re renting
Ready for More Inspiration?
Looking to elevate your space even further? These ideas are just the beginning. Check out more inspiring wall paneling concepts here: